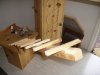
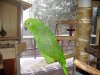
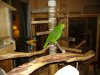
For the month of June we are excited to highlight Coco Momma's (Robin) Bird Room Setup! She did an amazing job of putting together a fun and beautiful place for Coco to keep busy and happy in. Enjoy!
1~ What kind of birds do you have and how many birds did you design your setup for?
Coco, a 15 year old yellow crowned amazon, and 3 budgies (Strider, who I found in a tree near my job, and two friends to keep him company - Bucky and Penske).
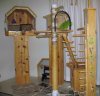
The cage-free area that we call "Fort Coco" was designed specifically for her alone. I do not not plan to add another bird to her area, but there is ample room. The budgies have their own very large area that we built and designed for them, but they are not cage-free.
2~ Is your setup for a handicapped bird?
No, but it could be easily be adapted for that purpose.
3~ Are there any budgeting tips you discovered while doing your setup?
It is very handy and cost effective to have a DIY DH (do-it-yourself dear husband)! He is a master carpenter and an artist, and I think capable of making just about anything. I was able to explain the various elements as I envisioned them, and talk to him about Coco's needs and considerations of a cage-free environment. Then he was able to draw it in 3 dimensions, allowing us to further brainstorm and tweak. The planning and design stage is critical and saves much money and heartache in the end. Using rope to draw the elements on the floor helped me visualize how it would actually lay out in the room.
Each element was designed to have many different pieces/sections, so when each piece was chewed, it was easy to remove, cut a new piece and replace. This saves a great deal of money.
The main house is removable from its base, has its own 'screen door' and can be used as a travel cage. I thought this was very cool! DH also added shelves and a door for hidden storage inside the base of the main house.
Plenty of planning ends up saving time, money and mistakes. We designed each element one at a time, starting with the main pole, so she could begin using the space immediately as we continued building and adding.
If the pieces are built somewhere other than the bird room (in our case the garage), be sure that they will fit around the corners, up the steps and through the bird room door! Plan ahead, and be sure pieces are not too heavy or bulky to move. If so, they will need to be crafted in the bird room itself.
Shop around, and buy quality wood and materials. Do not settle. Build it sturdy, and build it to last.
4~ Is your setup changeable or stationary and do you add or make changes continually or do things stay primarily as is?
It is completely movable. 3 of the 5 pieces I can move myself; the other 2 pieces require DH and a screw driver. When I relocate elements, I do it in the morning to give Coco ample time to become accustomed to the new set up before selecting her night time sleeping location.
5~ Where did you find your materials if you made it yourself or where did you purchase the setup and do you have favorite places to purchase safe toys and/or supplies that you find reliable?
All materials were purchased at Home Depot and Lowe's, and we also used a few of the perches we already had on hand. Each element is our own unique design.
6~ Do you have a favorite item that you bought for your setup?
I actually think my favorite "item" (and the least expensive) were the parrot-oriented rub on transfer designs I bought from a local craft store to decorate a few of the areas! It really gave it a 'birdie' feel!
7~ If you made any DIY toys what is your bird(s) favorite and were there any failures?
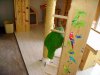
Fort Coco is actually one big DIY birdie toy! Coco has taken great care to add her own 'touches' to each piece of wood. She is especially drawn to the rungs of the ladders located on the water/toy tower and the ladder leading down to the lower foraging/play area. She also loves chewing on the rope that covers the main pole. One toy I made that was rejected were wood blocks strung on a piece of rope... boring!!!
8~ Did you incorporate into your setup any foraging toys and how did your bird(s) take to them and was age or inactivity a factor?
When changing to a cage-free environment, I believe there will always be a transition/learning curve. The biggest foraging change that I made was the decision to migrate Coco to foraging for ALL of her daily food as she would do if she were in the wild. I had to teach her to do this before it was possible to remove her food bowl. Once her skills were in place, I removed her food bowl, and each day I place her pellets, nuts and other foods in various nooks, crannies and other locations within the fort and she must forage for her daily nutrition which takes her a great part of the day. Each element was designed with the idea that it would be used for foraging of her daily food, and that it would contain angles, corners and nooks where food could be placed and found by her.
9~ What difficulties did you encounter, if any, and how did you remedy them?
Cleaning is probably the biggest consideration or difficulty for which to plan. I have back problems and did not want something that would be a pain (literally) to clean. To resolve this, we used enameled masonite over 3/4" plywood as flooring. The enameled masonite is easy to clean or cover with newspaper. Since the room is carpeted, this combination provided a solid surface upon which to place the elements. It turned out to be much easier and quicker to clean than a cage. The other difficulty was to ensure that perch placement was perfect so that no perches or elements would be soiled from any position. We resolved this through trial and error, and by always checking the "poop line" when placing a new element or perch.
10~ What do you like least about your set up (if anything)?
I wish it took up the entire room!
11~ What do you like most about your setup?
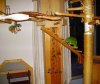
Simply that she is able to live completely cage and bar free. And the sliding glass doors provide her an awesome mountain view! Yet, not a day passes that I don't consider how I could tweak Fort Coco to make it even better, more interesting, challenging or enriching for her.
12~ Did your bird(s) take to the setup right away or did they approach it tentatively needing time to adjust and do you feel their age was a factor?
Immediately! She recognized her swing and perches, and was anxious to begin investigating and beaking everything!
13~ Any future renovations planned?
It is always a work in progress! I would love to add a climbing net and cover the walls with jungle murals!
Additionally here is a link to DIY instructions for my Cage Free Fort:
http://forums.avianavenue.com/diy-drive/45023-cocos-diy-cage-free-fort.html
1~ What kind of birds do you have and how many birds did you design your setup for?
Coco, a 15 year old yellow crowned amazon, and 3 budgies (Strider, who I found in a tree near my job, and two friends to keep him company - Bucky and Penske).
The cage-free area that we call "Fort Coco" was designed specifically for her alone. I do not not plan to add another bird to her area, but there is ample room. The budgies have their own very large area that we built and designed for them, but they are not cage-free.
2~ Is your setup for a handicapped bird?
No, but it could be easily be adapted for that purpose.
3~ Are there any budgeting tips you discovered while doing your setup?
It is very handy and cost effective to have a DIY DH (do-it-yourself dear husband)! He is a master carpenter and an artist, and I think capable of making just about anything. I was able to explain the various elements as I envisioned them, and talk to him about Coco's needs and considerations of a cage-free environment. Then he was able to draw it in 3 dimensions, allowing us to further brainstorm and tweak. The planning and design stage is critical and saves much money and heartache in the end. Using rope to draw the elements on the floor helped me visualize how it would actually lay out in the room.
Each element was designed to have many different pieces/sections, so when each piece was chewed, it was easy to remove, cut a new piece and replace. This saves a great deal of money.
The main house is removable from its base, has its own 'screen door' and can be used as a travel cage. I thought this was very cool! DH also added shelves and a door for hidden storage inside the base of the main house.
Plenty of planning ends up saving time, money and mistakes. We designed each element one at a time, starting with the main pole, so she could begin using the space immediately as we continued building and adding.
If the pieces are built somewhere other than the bird room (in our case the garage), be sure that they will fit around the corners, up the steps and through the bird room door! Plan ahead, and be sure pieces are not too heavy or bulky to move. If so, they will need to be crafted in the bird room itself.
Shop around, and buy quality wood and materials. Do not settle. Build it sturdy, and build it to last.
4~ Is your setup changeable or stationary and do you add or make changes continually or do things stay primarily as is?
It is completely movable. 3 of the 5 pieces I can move myself; the other 2 pieces require DH and a screw driver. When I relocate elements, I do it in the morning to give Coco ample time to become accustomed to the new set up before selecting her night time sleeping location.
5~ Where did you find your materials if you made it yourself or where did you purchase the setup and do you have favorite places to purchase safe toys and/or supplies that you find reliable?
All materials were purchased at Home Depot and Lowe's, and we also used a few of the perches we already had on hand. Each element is our own unique design.
6~ Do you have a favorite item that you bought for your setup?
I actually think my favorite "item" (and the least expensive) were the parrot-oriented rub on transfer designs I bought from a local craft store to decorate a few of the areas! It really gave it a 'birdie' feel!
7~ If you made any DIY toys what is your bird(s) favorite and were there any failures?
Fort Coco is actually one big DIY birdie toy! Coco has taken great care to add her own 'touches' to each piece of wood. She is especially drawn to the rungs of the ladders located on the water/toy tower and the ladder leading down to the lower foraging/play area. She also loves chewing on the rope that covers the main pole. One toy I made that was rejected were wood blocks strung on a piece of rope... boring!!!
8~ Did you incorporate into your setup any foraging toys and how did your bird(s) take to them and was age or inactivity a factor?
When changing to a cage-free environment, I believe there will always be a transition/learning curve. The biggest foraging change that I made was the decision to migrate Coco to foraging for ALL of her daily food as she would do if she were in the wild. I had to teach her to do this before it was possible to remove her food bowl. Once her skills were in place, I removed her food bowl, and each day I place her pellets, nuts and other foods in various nooks, crannies and other locations within the fort and she must forage for her daily nutrition which takes her a great part of the day. Each element was designed with the idea that it would be used for foraging of her daily food, and that it would contain angles, corners and nooks where food could be placed and found by her.
9~ What difficulties did you encounter, if any, and how did you remedy them?
Cleaning is probably the biggest consideration or difficulty for which to plan. I have back problems and did not want something that would be a pain (literally) to clean. To resolve this, we used enameled masonite over 3/4" plywood as flooring. The enameled masonite is easy to clean or cover with newspaper. Since the room is carpeted, this combination provided a solid surface upon which to place the elements. It turned out to be much easier and quicker to clean than a cage. The other difficulty was to ensure that perch placement was perfect so that no perches or elements would be soiled from any position. We resolved this through trial and error, and by always checking the "poop line" when placing a new element or perch.
10~ What do you like least about your set up (if anything)?
I wish it took up the entire room!
11~ What do you like most about your setup?
Simply that she is able to live completely cage and bar free. And the sliding glass doors provide her an awesome mountain view! Yet, not a day passes that I don't consider how I could tweak Fort Coco to make it even better, more interesting, challenging or enriching for her.
12~ Did your bird(s) take to the setup right away or did they approach it tentatively needing time to adjust and do you feel their age was a factor?
Immediately! She recognized her swing and perches, and was anxious to begin investigating and beaking everything!
13~ Any future renovations planned?
It is always a work in progress! I would love to add a climbing net and cover the walls with jungle murals!
Additionally here is a link to DIY instructions for my Cage Free Fort:
http://forums.avianavenue.com/diy-drive/45023-cocos-diy-cage-free-fort.html
Attachments
-
 55.5 KB Views: 400
 -
 73.4 KB Views: 27
 -
 108.7 KB Views: 33
 -
 53.4 KB Views: 400
 -
 78.1 KB Views: 396
 -
 85.9 KB Views: 25
Last edited:

")


