wolfysluv
Sprinting down the street
Intro:
This version of a tube collar was the answer to our prayers and has helped others. Feel free to contact me or post here for questions and as well as suggestions as to how to improve the design.
This collar can be contructed to be as short or as long as so you can regulate how much movement or non movement you'd like the bird to have.
The only improvement that I "must" make someday, is to make the ends of the collar meet uniformly and always exactly the same each time with absolutely no play invovled. I'd like the whole guessing game of using your fingers to fit the collar on before wrapping taking out so there is no way for a helper to accidently put it on too tight or too loose once the collar is constructed. Perhaps I'm a spaz and all that needs to be done is make the ends of the collar thick and firm somehow so there is no play in the collar so for them to overlay, and change with time, etc.
Wolfy
I decided to start a new thread about Tika's tube collar since I've had so much success with it. The idea was inspired by a make shift temporary tube collar for a Goffin with feather plucking issues that I found on the web. And it saved Tika's life.
It is far from perfect. What makes it so wonderful is the fact that it is breathable, soft and gentle. Ironically it is this very thing that leads to two issues that need to be resolved with the design. Each time you put it on the diameter can vary, and it would be nice if the process of taking it off and on were easier. Maybe others with other various types of collars and ways to make them could also add onto this thread! But if not, that is okay. This collar is comfortable, is gentle on the feathers and skin, and gives the bird mobility.
We have tried e-collars and at one point one broke Tikas blood feathers around her neck. We had to rush her to the vet to stop the bleeding mess. Then we were stuck with no way to collar at that point and a bird that wanted to take chunks out of her injuries. She was able to snag and tear up bandages. Just as disturbingly, even when the e-collar worked, no matter which way we put it on it restricted movement so much so that it seemed cruel to me. After just several days of using the collar, my bird actually became weak ... even with giving her breaks from it each day.
The vet could not find a kind collar for long term treatment. I searched high and wide and spoke to many sanctuaries about the situation. I did find a acrylic like bubble shaped tube collar on the web, but no one could get a hold of it for me. Besides, I noticed it didn't breath ... and for extended periods of collaring as I needed it for (months and years), it was not the best solution.
Well, lets get started!
Okay. First, I'll start with showing you conventional E-collar most vets give you when a bird is injured, plucking, or mutilating.
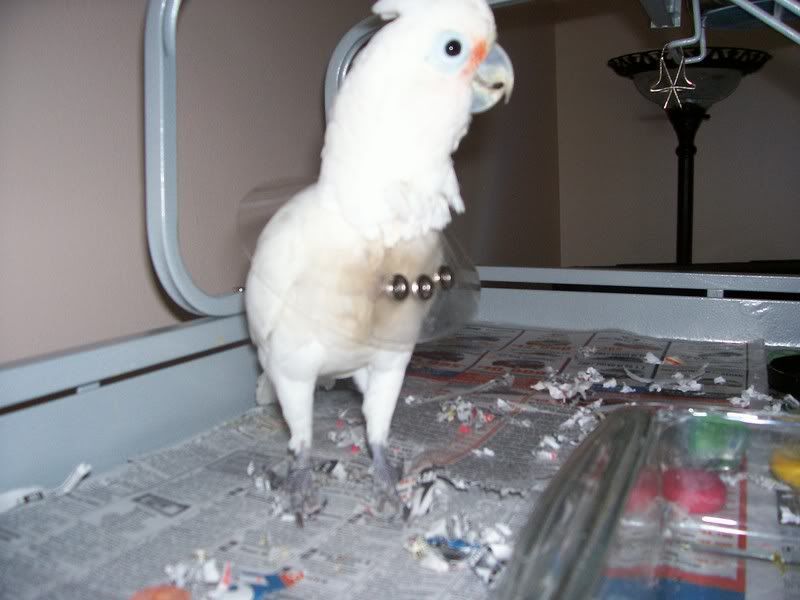
This is not a good option long term. The bird cannot raise the wings, balance, or climb. Even if you turn it upside down so the wings can extend, the bird cannot climb. In addition most birds can reach their entire neck area.
These collars can be rough on the feathers over time. Even if you put soft bandaging around the inside of the collar to protect their neck, it can malform feathers growing in and even break blood feathers. You can see Tika's mutilated area with open wounds that the e-collar protects, I think you might be able to see damaged feathers from the collar there as well.
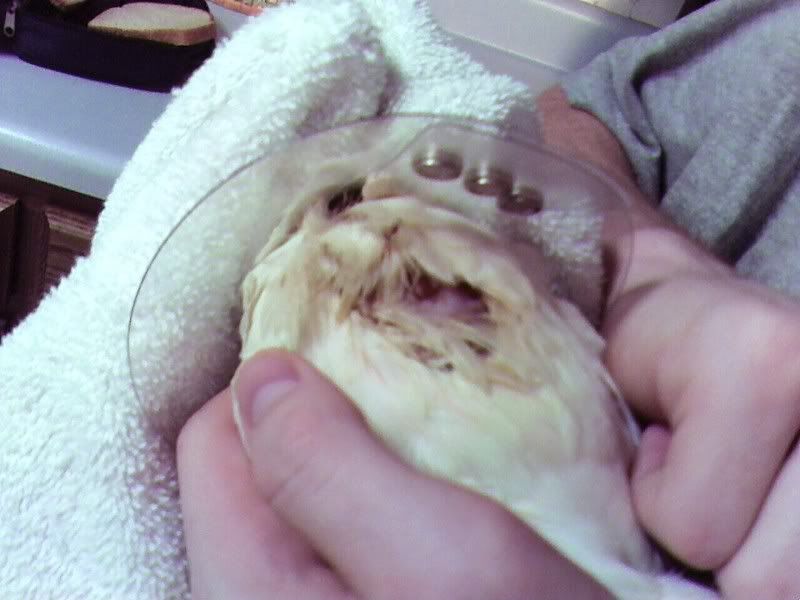
Another collar that is much superior to an E-collar is the tube collar. There are many variations of them. The type I've chosen to make is probably the most inefficient to make of all the ones I've seen on the web. However, mine is flexible, gentle, and breaths. My avian vet says that it's the best option that she's ever seen. The convenient plastic ones that past companies have made hold moisture and could potentially breed bacteria or fungus. They are not and not as comfortable for the bird. However, in most situations, they are probably still better than an E-collar.
The following pictures will demonstrate how I make mine. I'm sure there are other ways of making something similar that are easier. But this has worked well for me and my Tika. My only complaint about it is it could be very easy to put it on too tight or too loose since there are no definitive ends on the device so to speak. Other than that, it's fantabulous lol.
We'll start with supplies which are, a clean toilet paper tube, scissors, gauze, and cloth medical tape.
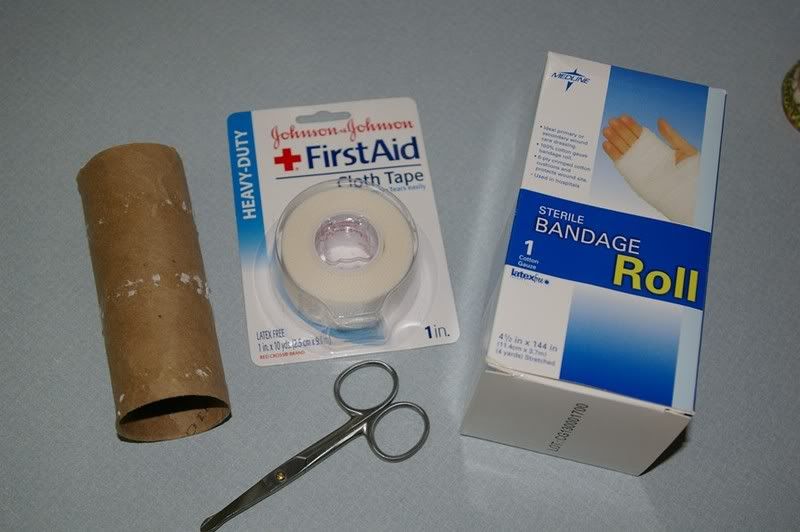
The most difficult thing about making your collar is fitting it. Since there is so much leeway with sizing due to wrapping and padding, it's all a matter of hit or miss unfortunately. It may take several tries to get it just right.
Cut your toilet paper roll into a small strip so that its "tall" enough with wrapping added to cover the birds neck. Cut it long enough so that you can wrap it around the birds neck while leaving lots of space to add padding. In the end, the bird should be able to hold it's head in a natural resting position on top of the finished collar. The front of the collar should extend from the bottom of chin to the bottom of the neck/top of the body/chest. The back of the collar should extend from the bottom/base of the skull down to the bottom of the neck and sit on top of the shoulders. It should not ever stretch the neck. Its better to make the collar too short from top to bottom and too wide around the neck than vice versa so you do not hurt your bird. In other words, its better to make the collar too short so the bird can move around, than to make it too large so the birds neck is stretched which it should not be. Ultimately, you want the result to be such that the bird cannot bend down and pick its neck, chest, upper thighs, its shoulders and as well as most of it's back. But he should have full mobility otherwise and be able to perch comfortably.
Cut your strip, and cut the sharp ends off:
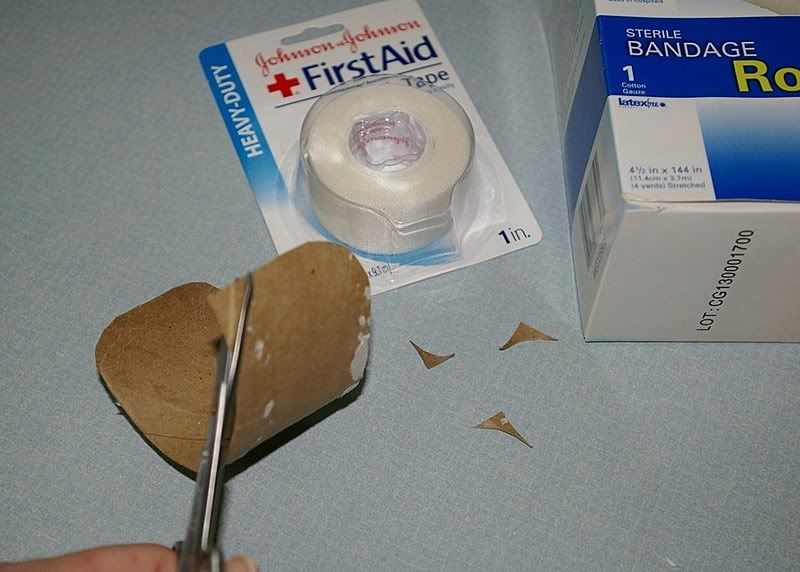
Start wrapping the strip with guaze:
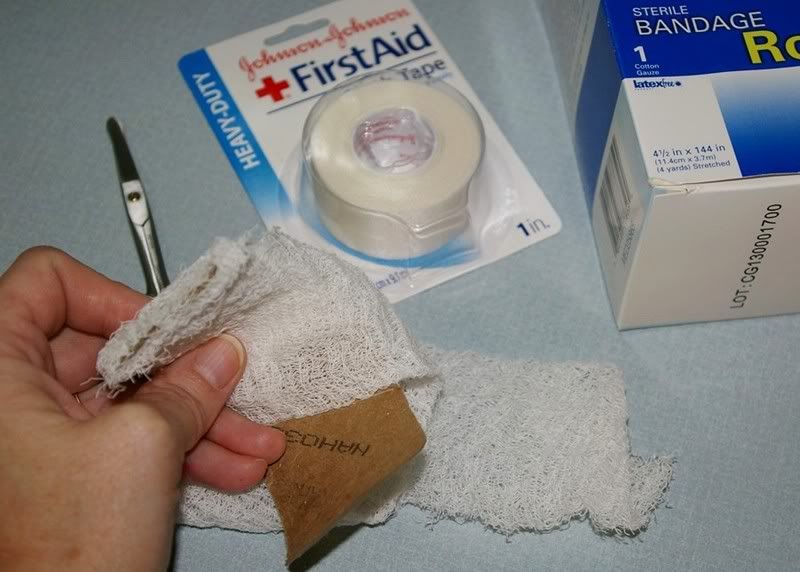
Wrap the entire thing nice and cushy and make sure it's thick enough that it has support. Use a little tape to anchor it in place when finished:
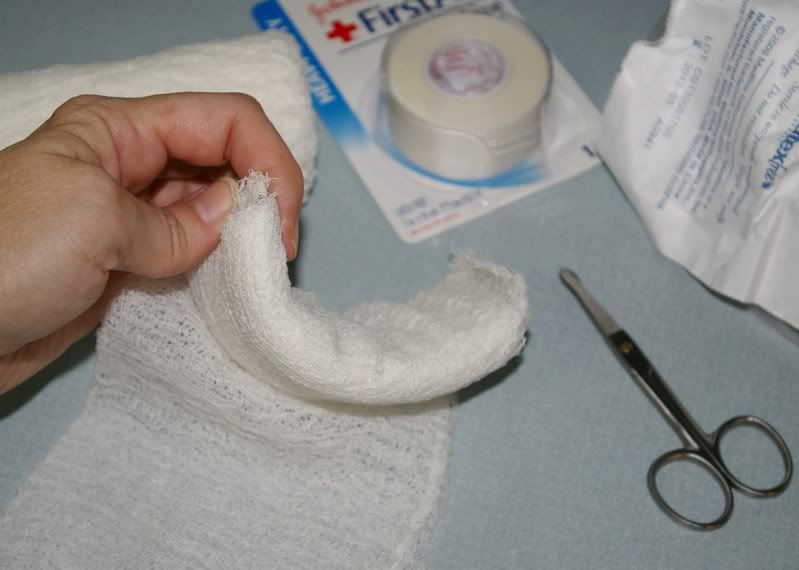
The next step is optional, but most people find that any tube collar with a "lip" helps prevent the bird from reaching spots to pick. It strengthens the collar. And It is probably more comfortable for them too. Some people put lips on both ends. I like a thick cushy one on top and just a small one on the bottom just to take the edge off of where it meets the birds shoulders.
Take some gauze that is the same length as the collar and roll it so it's like a piece of rope. Take very small pieces of tape and begin to cover the rope and attach it to the top and outside of the collar. Do not cover the collar in tape, because you want it to breath.
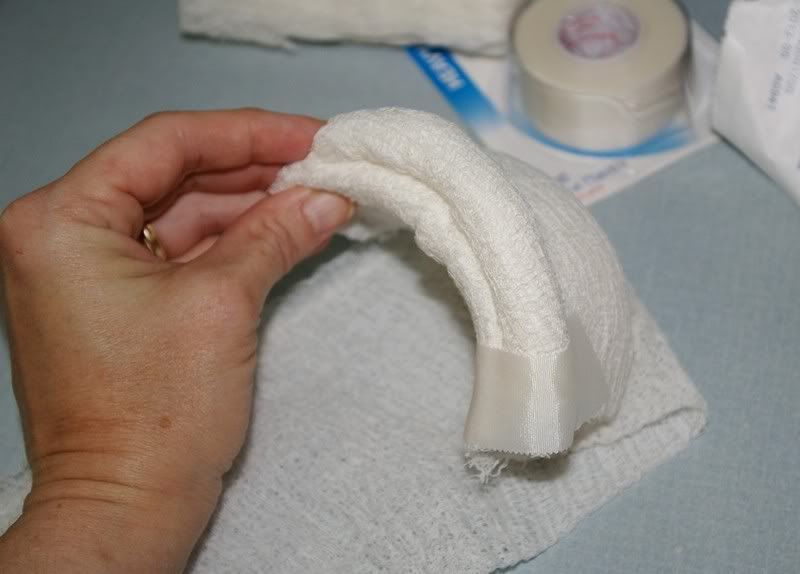
You want the lip taped on there good, but you don't want a lot of tape on the inside and outside of the collar either. Always, always work to make smooth surfaces. Never let anything bulge, stick out, etc, ever. Your brace will tear apart faster if there are imperfections and most important, it will irritate the poor birdie.
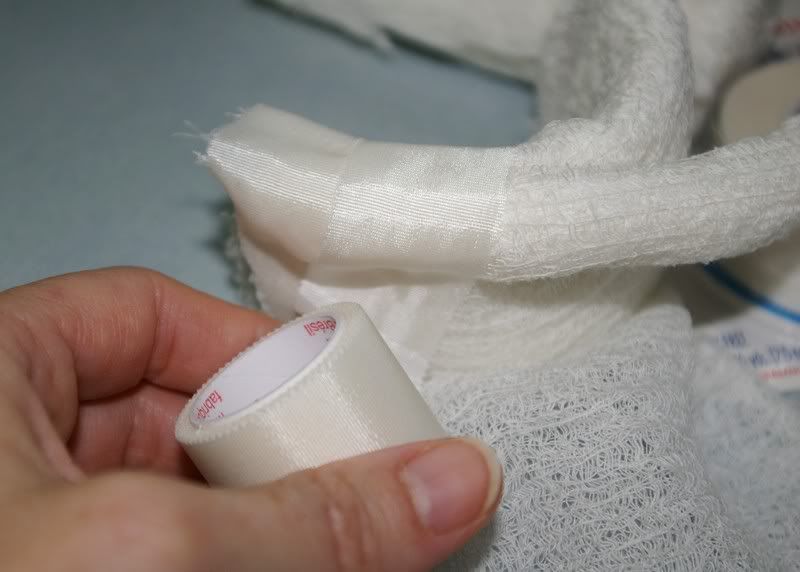
See?

This example is not done as well as I usually do it. Usually it's perfectly symmetrical with perfect lines so the bird is not attracted/distracted by imperfections. But I wanted you to see how the mid section of the collar inside and out does not have tape on it so it breaths.
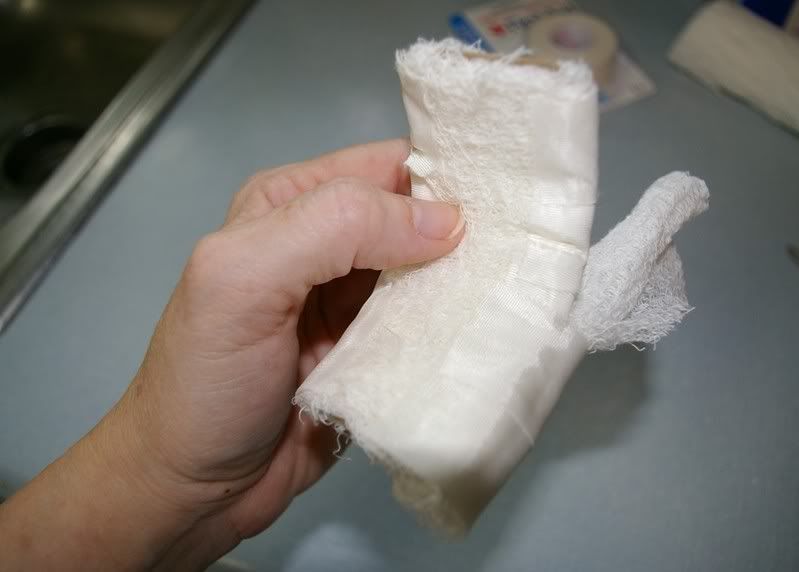
This is the shape your finished collar should look like. Now this one is SIX months old, so it quite worn and has lots of patch work done. Normally, like I said you should see mostly gauze in the middle of the outside and inside of the collar. There is too much tape on this one from me patching it over time. but medical cloth tape still breaths to a small extent, so that's okay.
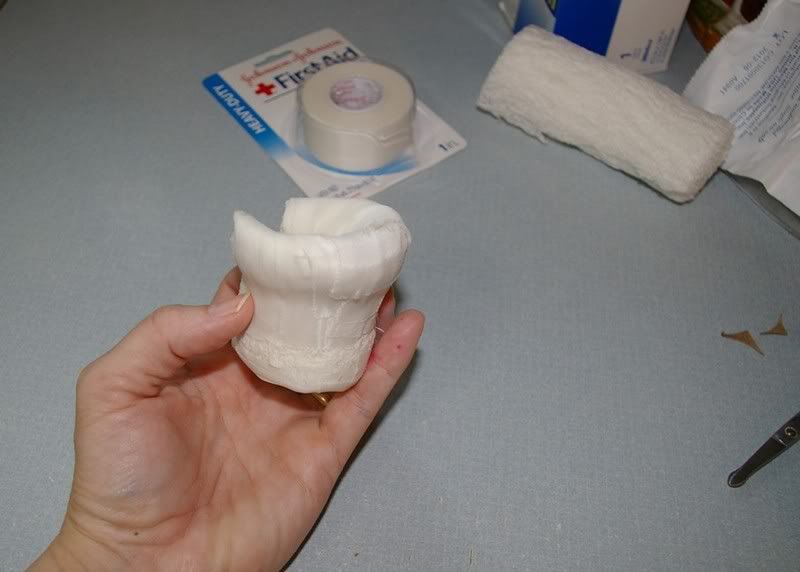
Now, attaching it. Slip the collar around the bird so the slit is up top, on the back of the birds neck. And begin to wrap some gauze around it to hold it in place. It takes a lot of practice. If you leave it too loose, the bird can use its bottom jaw/beak to tear up the collar. He can also get his foot caught inside of it trying to take it off. If you put it on too tight ... well, I won't go there and how sad and dangerous that would be. You want it cozy with a little space around the bitty neck. Generally, I make sure that I can comfortably slip my finger in the tube from the top as well as from the bottom (make sure you do both). Men with larger hands/fingers may want to use their pinky finger for spacing.
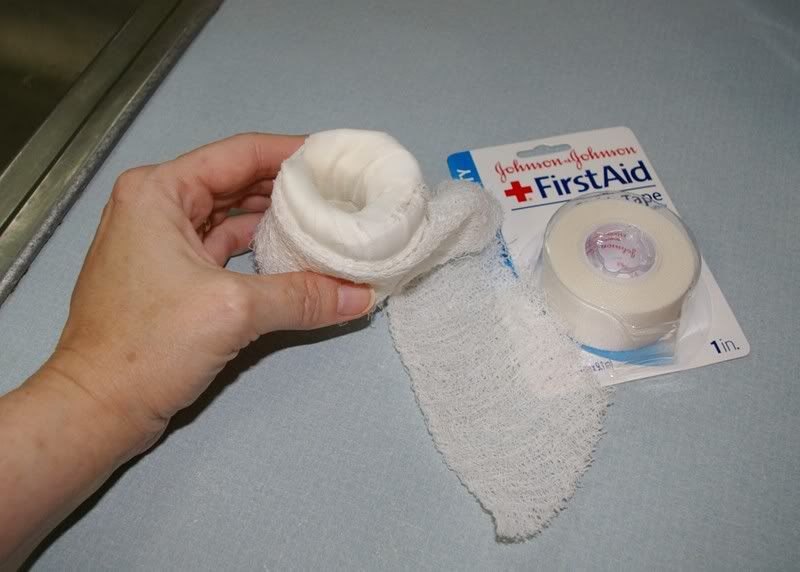
I finish up with a very short piece of gauze around the outside. This is to protect the wrapping gauze so that when you take the collar off and on, you won't go through rolls and rolls of gauze. In other words, you only replace the outside tape and the little protective piece of guaze the majority of the time.
Then I use two long pieces of tape wrapped around the outside of the collar to cover the gauze. You must make it virtually seamless and cover the gauze so the baby cannot snag a toe on it to rip it off.

Here is finished product on. The bird can eat well, breath well, move around freely, and is a happy Bappy.
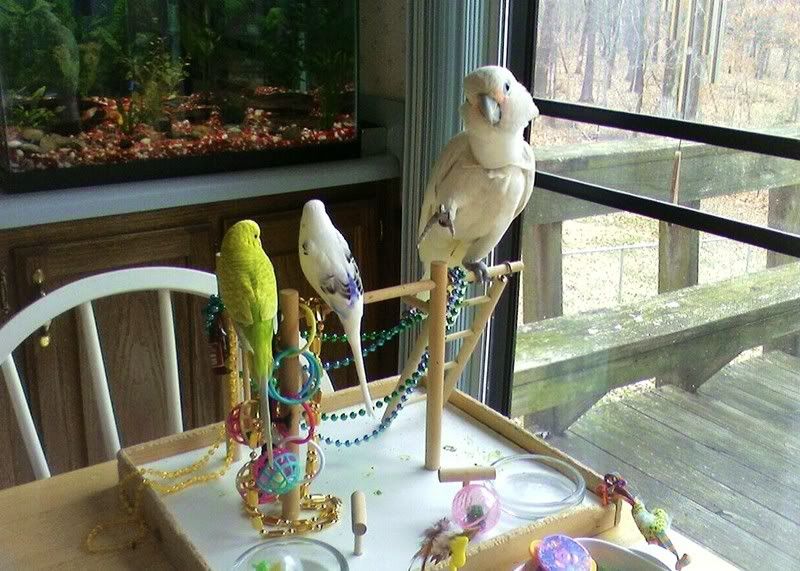
Lastly here are two photos of why I like this collar so much. The comfort and the freedom. Birds can even learn to fly with these collars on. See how they don't impede wing movement?
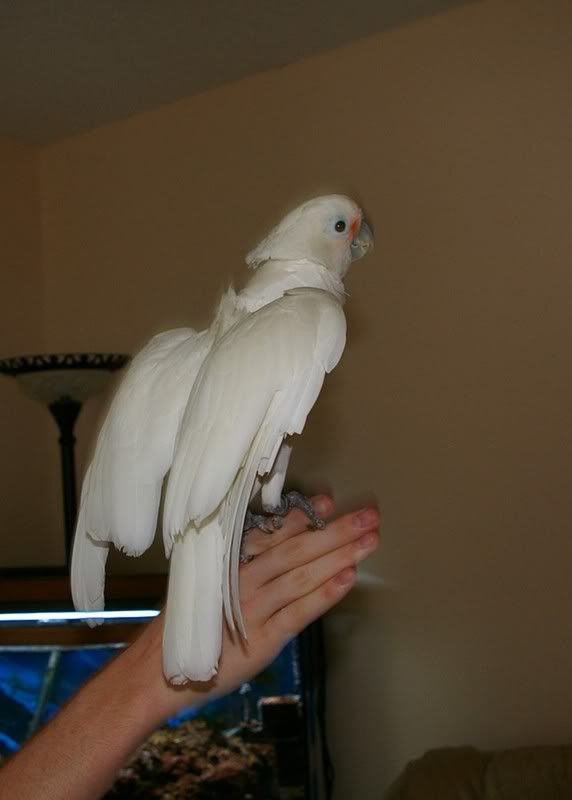
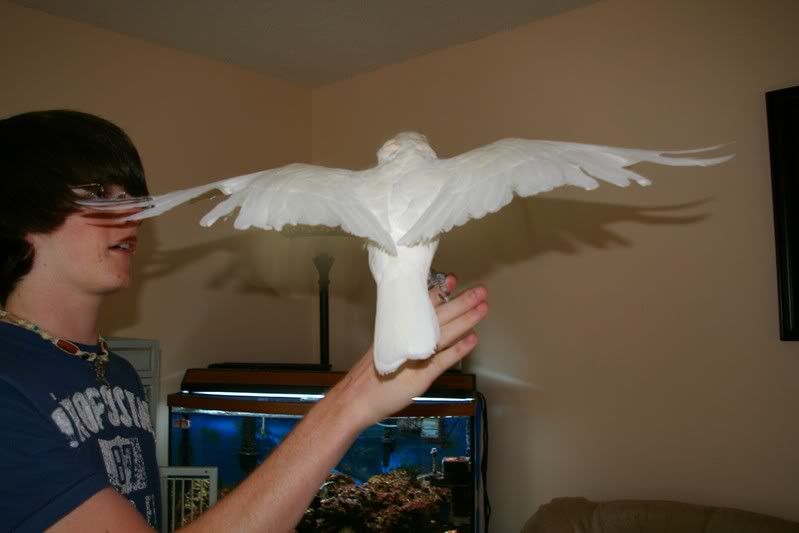
Yet Tika can only reach the bottom half of her legs, the very back of her her body/bottom, and her tail.
I despise having to use any collar. And if Tika only plucked, it would probably be my personal preference to let her if it did not affect her well being rather than seeing those eyes look at me asking "why". But she is a mutilator, and it's quite literally this or death. As long as she plays with her budgies, flys, climbs, and can talk a little (For some reason not all birds have full vocal range when they wear this kind of collar), this will buy her time. I take it off every day or every other day for baths, excercise, playing and yelling sessions (we have fun), and most of all to sit with me and to allow her to groom. Although I don't think it's the best quality of life, it offers some dignity, and it is the most humane that I've found. So, it's one day at a time for us ...
Addendum:
Many birds do not vocalize when they are getting used to the collar. That is normal. In time (which can be very long), they do get used to it and they will vocalize, but I've noticed its not nearly as much or as loud as normal.
I strongly recommend soft feedings and comfort feedings at least once a day as well while they first get used to being collared. Some birds do not like the feeling of eating harder kibbles while they are getting used to the feeling of something around their neck. Softening their food with a bit of warm water added will help that and prevent any eating issues. Watch your birds weight carefully to make sure they are indeed fine with the situation and eating properly. But this will pass with time and they'll be back to eating their foods as they once did. Collars do not phase some birds in the least when it comes to eating.
Understandably some birds may get sad or even angry about collaring at first. So actualy comfort feedings will help take a lot of emotional stress away from the situation. Lovely bowels of warm, soft mashes made out of their favorite things such as banana's, sweet potatoes, etc along with a filler such as some fo the finer mixes of Beak Appetite, or oatmeal, or crumbled wheat toast helps cheer up a bandaged birdie! Sally Blanchard has a recipee for "glop" that you can boost up with calories and added nutrition by adding a little flax seed oil, drop of vitamins, a hint of mashed veggies, chicken or vegatable baby food, finely mashed egg, and make a good portion of it their favorite flavors/foods. Tika has a sweet tooth, so I use a sweet potoato or banana .. make it taste irresisitable and warm it up. Some birds like it like as a thick pudding consistency, but others might like it a bit chunky. Just make it fun and easy for yourself and a treat for your bird.
This version of a tube collar was the answer to our prayers and has helped others. Feel free to contact me or post here for questions and as well as suggestions as to how to improve the design.
This collar can be contructed to be as short or as long as so you can regulate how much movement or non movement you'd like the bird to have.
The only improvement that I "must" make someday, is to make the ends of the collar meet uniformly and always exactly the same each time with absolutely no play invovled. I'd like the whole guessing game of using your fingers to fit the collar on before wrapping taking out so there is no way for a helper to accidently put it on too tight or too loose once the collar is constructed. Perhaps I'm a spaz and all that needs to be done is make the ends of the collar thick and firm somehow so there is no play in the collar so for them to overlay, and change with time, etc.
Wolfy
How to Make a Humane Tube Collar
I decided to start a new thread about Tika's tube collar since I've had so much success with it. The idea was inspired by a make shift temporary tube collar for a Goffin with feather plucking issues that I found on the web. And it saved Tika's life.
It is far from perfect. What makes it so wonderful is the fact that it is breathable, soft and gentle. Ironically it is this very thing that leads to two issues that need to be resolved with the design. Each time you put it on the diameter can vary, and it would be nice if the process of taking it off and on were easier. Maybe others with other various types of collars and ways to make them could also add onto this thread! But if not, that is okay. This collar is comfortable, is gentle on the feathers and skin, and gives the bird mobility.
We have tried e-collars and at one point one broke Tikas blood feathers around her neck. We had to rush her to the vet to stop the bleeding mess. Then we were stuck with no way to collar at that point and a bird that wanted to take chunks out of her injuries. She was able to snag and tear up bandages. Just as disturbingly, even when the e-collar worked, no matter which way we put it on it restricted movement so much so that it seemed cruel to me. After just several days of using the collar, my bird actually became weak ... even with giving her breaks from it each day.
The vet could not find a kind collar for long term treatment. I searched high and wide and spoke to many sanctuaries about the situation. I did find a acrylic like bubble shaped tube collar on the web, but no one could get a hold of it for me. Besides, I noticed it didn't breath ... and for extended periods of collaring as I needed it for (months and years), it was not the best solution.
Well, lets get started!
Okay. First, I'll start with showing you conventional E-collar most vets give you when a bird is injured, plucking, or mutilating.

This is not a good option long term. The bird cannot raise the wings, balance, or climb. Even if you turn it upside down so the wings can extend, the bird cannot climb. In addition most birds can reach their entire neck area.
These collars can be rough on the feathers over time. Even if you put soft bandaging around the inside of the collar to protect their neck, it can malform feathers growing in and even break blood feathers. You can see Tika's mutilated area with open wounds that the e-collar protects, I think you might be able to see damaged feathers from the collar there as well.

Another collar that is much superior to an E-collar is the tube collar. There are many variations of them. The type I've chosen to make is probably the most inefficient to make of all the ones I've seen on the web. However, mine is flexible, gentle, and breaths. My avian vet says that it's the best option that she's ever seen. The convenient plastic ones that past companies have made hold moisture and could potentially breed bacteria or fungus. They are not and not as comfortable for the bird. However, in most situations, they are probably still better than an E-collar.
The following pictures will demonstrate how I make mine. I'm sure there are other ways of making something similar that are easier. But this has worked well for me and my Tika. My only complaint about it is it could be very easy to put it on too tight or too loose since there are no definitive ends on the device so to speak. Other than that, it's fantabulous lol.
We'll start with supplies which are, a clean toilet paper tube, scissors, gauze, and cloth medical tape.

The most difficult thing about making your collar is fitting it. Since there is so much leeway with sizing due to wrapping and padding, it's all a matter of hit or miss unfortunately. It may take several tries to get it just right.
Cut your toilet paper roll into a small strip so that its "tall" enough with wrapping added to cover the birds neck. Cut it long enough so that you can wrap it around the birds neck while leaving lots of space to add padding. In the end, the bird should be able to hold it's head in a natural resting position on top of the finished collar. The front of the collar should extend from the bottom of chin to the bottom of the neck/top of the body/chest. The back of the collar should extend from the bottom/base of the skull down to the bottom of the neck and sit on top of the shoulders. It should not ever stretch the neck. Its better to make the collar too short from top to bottom and too wide around the neck than vice versa so you do not hurt your bird. In other words, its better to make the collar too short so the bird can move around, than to make it too large so the birds neck is stretched which it should not be. Ultimately, you want the result to be such that the bird cannot bend down and pick its neck, chest, upper thighs, its shoulders and as well as most of it's back. But he should have full mobility otherwise and be able to perch comfortably.
Cut your strip, and cut the sharp ends off:

Start wrapping the strip with guaze:

Wrap the entire thing nice and cushy and make sure it's thick enough that it has support. Use a little tape to anchor it in place when finished:

The next step is optional, but most people find that any tube collar with a "lip" helps prevent the bird from reaching spots to pick. It strengthens the collar. And It is probably more comfortable for them too. Some people put lips on both ends. I like a thick cushy one on top and just a small one on the bottom just to take the edge off of where it meets the birds shoulders.
Take some gauze that is the same length as the collar and roll it so it's like a piece of rope. Take very small pieces of tape and begin to cover the rope and attach it to the top and outside of the collar. Do not cover the collar in tape, because you want it to breath.

You want the lip taped on there good, but you don't want a lot of tape on the inside and outside of the collar either. Always, always work to make smooth surfaces. Never let anything bulge, stick out, etc, ever. Your brace will tear apart faster if there are imperfections and most important, it will irritate the poor birdie.

See?

This example is not done as well as I usually do it. Usually it's perfectly symmetrical with perfect lines so the bird is not attracted/distracted by imperfections. But I wanted you to see how the mid section of the collar inside and out does not have tape on it so it breaths.

This is the shape your finished collar should look like. Now this one is SIX months old, so it quite worn and has lots of patch work done. Normally, like I said you should see mostly gauze in the middle of the outside and inside of the collar. There is too much tape on this one from me patching it over time. but medical cloth tape still breaths to a small extent, so that's okay.

Now, attaching it. Slip the collar around the bird so the slit is up top, on the back of the birds neck. And begin to wrap some gauze around it to hold it in place. It takes a lot of practice. If you leave it too loose, the bird can use its bottom jaw/beak to tear up the collar. He can also get his foot caught inside of it trying to take it off. If you put it on too tight ... well, I won't go there and how sad and dangerous that would be. You want it cozy with a little space around the bitty neck. Generally, I make sure that I can comfortably slip my finger in the tube from the top as well as from the bottom (make sure you do both). Men with larger hands/fingers may want to use their pinky finger for spacing.

I finish up with a very short piece of gauze around the outside. This is to protect the wrapping gauze so that when you take the collar off and on, you won't go through rolls and rolls of gauze. In other words, you only replace the outside tape and the little protective piece of guaze the majority of the time.
Then I use two long pieces of tape wrapped around the outside of the collar to cover the gauze. You must make it virtually seamless and cover the gauze so the baby cannot snag a toe on it to rip it off.

Here is finished product on. The bird can eat well, breath well, move around freely, and is a happy Bappy.

Lastly here are two photos of why I like this collar so much. The comfort and the freedom. Birds can even learn to fly with these collars on. See how they don't impede wing movement?


Yet Tika can only reach the bottom half of her legs, the very back of her her body/bottom, and her tail.
I despise having to use any collar. And if Tika only plucked, it would probably be my personal preference to let her if it did not affect her well being rather than seeing those eyes look at me asking "why". But she is a mutilator, and it's quite literally this or death. As long as she plays with her budgies, flys, climbs, and can talk a little (For some reason not all birds have full vocal range when they wear this kind of collar), this will buy her time. I take it off every day or every other day for baths, excercise, playing and yelling sessions (we have fun), and most of all to sit with me and to allow her to groom. Although I don't think it's the best quality of life, it offers some dignity, and it is the most humane that I've found. So, it's one day at a time for us ...
Addendum:
Many birds do not vocalize when they are getting used to the collar. That is normal. In time (which can be very long), they do get used to it and they will vocalize, but I've noticed its not nearly as much or as loud as normal.
I strongly recommend soft feedings and comfort feedings at least once a day as well while they first get used to being collared. Some birds do not like the feeling of eating harder kibbles while they are getting used to the feeling of something around their neck. Softening their food with a bit of warm water added will help that and prevent any eating issues. Watch your birds weight carefully to make sure they are indeed fine with the situation and eating properly. But this will pass with time and they'll be back to eating their foods as they once did. Collars do not phase some birds in the least when it comes to eating.
Understandably some birds may get sad or even angry about collaring at first. So actualy comfort feedings will help take a lot of emotional stress away from the situation. Lovely bowels of warm, soft mashes made out of their favorite things such as banana's, sweet potatoes, etc along with a filler such as some fo the finer mixes of Beak Appetite, or oatmeal, or crumbled wheat toast helps cheer up a bandaged birdie! Sally Blanchard has a recipee for "glop" that you can boost up with calories and added nutrition by adding a little flax seed oil, drop of vitamins, a hint of mashed veggies, chicken or vegatable baby food, finely mashed egg, and make a good portion of it their favorite flavors/foods. Tika has a sweet tooth, so I use a sweet potoato or banana .. make it taste irresisitable and warm it up. Some birds like it like as a thick pudding consistency, but others might like it a bit chunky. Just make it fun and easy for yourself and a treat for your bird.
Last edited:


